Cluster creation workflow
The EKS Anywhere cluster creation process makes it easy not only to bring up a cluster initially, but also to update configuration settings and to upgrade Kubernetes versions going forward. The EKS Anywhere cluster versions match the same Kubernetes distribution versions that are used in the AWS EKS cloud service.
Each EKS Anywhere cluster is built from a cluster specification file, with the structure of the configuration file based on the target provider for the cluster. Currently, VMware vSphere is the recommended provider for supported EKS Anywhere clusters. So, vSphere is the example provider we step through here.
This document provides an in-depth description of the process of creating an EKS Anywhere cluster. It starts by describing the components to put in place before creating the cluster. Then it shows you what happens at each step of the process. After that, the document describes the attributes of the resulting cluster.
Before cluster creation
Some assets need to be in place before you can create an EKS Anywhere cluster. You need to have an Administrative machine that includes the tools required to create the cluster. Next, you need get the software tools and artifacts used to build the cluster. Then you also need to prepare the provider, in this case a vCenter environment, on which to create the resulting cluster.
Administrative machine
The Administrative machine is needed to provide:
- A place to run the commands to create and manage the workload cluster.
- A Docker container runtime to run a temporary, local bootstrap cluster that creates the resulting workload cluster.
- A place to hold the
kubeconfigfile needed to perform administrative actions usingkubectl. (Thekubeconfigfile is stored in the root of the folder created during cluster creation.)
The Administrative machine can be any computer (such as your local laptop) with a supported operating system that meets the requirements. It must also have Internet access to the places where the command line tools and EKS Anywhere artifacts are made available. Likewise, the Administrative machine must be able to reach and have access to the provider (vSphere). See the Install EKS Anywhere guide for Administrative machine requirements.
EKS Anywhere software
To obtain EKS Anywhere software, you need Internet access to the repositories holding that software. EKS Anywhere does not currently support the use of private registries and repositories for the software that EKS Anywhere needs to draw on during cluster creation at this time. EKS Anywhere software is divided into two types of components. The CLI interface for managing clusters and the cluster components and controllers used to run workloads and configure clusters. The software you need to obtain includes:
- Command line tools: Binaries to install on the administrative machine
, include
eksctl,eksctl-anywhere,kubectl, andaws-iam-authenticator. - Cluster components and controllers: These include artifacts such as OVAs for different operating systems and Kubernetes versions to Import to vSphere .
The sites to which the administrative machine and the target workload environment need access are listed in the Requirements section. If you are operating behind a firewall that limits access to the Internet, you can configure EKS Anywhere to identify the location of the proxy service you choose to connect to the Internet.
For more information on the software used in EKS Distro, which includes the Kubernetes release and related software in EKS Anywhere, see the EKS Distro Releases GitHub page. For information on the Ubuntu and Bottlerocket operating systems used with EKS Anywhere, see the EKS Anywhere Artifacts page.
Providers
EKS Anywhere uses an infrastructure provider model for creating, upgrading, and managing Kubernetes clusters that leverages the Kubernetes Cluster API project. The first supported EKS Anywhere provider, VMware vSphere, is implemented based on the Kubernetes Cluster API Provider vsphere (CAPV) specifications.
Like Cluster API, EKS Anywhere runs a kind
cluster on the local Administrative machine to act as a bootstrap cluster.
However, instead of using CAPI directly with the clusterctl command to manage the workload cluster, you use the eksctl anywhere command which abstracts that process for you, including calling clusterctl under the covers.
As for other providers, the EKS Anywhere project documents the Cluster API Provider Docker (CAPD) , but doesn’t support it for production use. Expect other providers to be supported for EKS Anywhere in the future. If you are interested in EKS Anywhere supporting a different provider, feel free to create an an issue on Github for consideration.
With your Administrative machine in place, to prepare the vSphere provider for EKS Anywhere you need to make sure your vSphere environment meets the EKS Anywhere requirements and that permissions set up properly. If you don’t want to use the default OVA images, you can import the OVAs representing the operating systems and Kubernetes releases you want.
Creating a cluster
With the provider (vSphere) prepared and the Administrative machine set up to run Docker and the required binaries, you can create an EKS Anywhere cluster. This section steps through an example of an EKS Anywhere cluster being created on a vSphere provider. Once you understand this process, you can use the following documentation to create your own cluster:
- Create production cluster for the exact procedure to create a cluster on vSphere.
- Troubleshooting if you encounter problems along the way.
Starting the process
To start, the eksctl anywhere command is used to generate a cluster config file, which you can then modify and use to create the cluster.
The following diagram illustrates what happens when you start the cluster creation process:
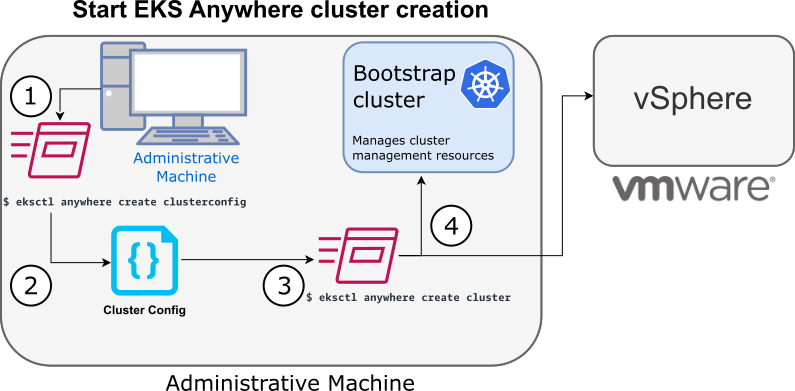
1. Generate an EKS Anywhere config file
When you run eksctl anywhere generate clusterconfig, the two pieces of information you provide are the name of the cluster ($CLUSTER_NAME) and the type of provider (-p vsphere, in this example).
Then you can direct the yaml cluster config output into a file (> $CLUSTER_NAME.yaml). For example:
eksctl anywhere generate clusterconfig $CLUSTER_NAME -p vpshere > $CLUSTER_NAME.yaml
The provider is important because the type of cluster config created is based on the provider.
The docker provider is the only other (although unsupported for production use) provider documented with EKS Anywhere.
The result of this command is a config file template that you need to modify for the specific instance of your provider.
2. Modify the EKS Anywhere config file
Using the generated cluster config file, make modifications to suit your situation. Details about this config file are contained in the vSphere Config There are several things to consider when modifying the cluster config file:
- vSphere configuration describes general vSphere cluster configuration information.
- etcd configuration describes different etcd topologies.
- OIDC configuration describes choices for identity providers.
- GitOps configuration describes how to manage your cluster using GitOps.
- Proxy configuration describes how to configure EKS Anywhere to point to a proxy service, if you need to configure your cluster to connect to the Internet through a proxy server.
Pay particular attention to which settings are optional and which are required. Also, not all properties can be upgraded, so it is important to get those settings right at cluster creation. See supported cluster properties, related to GitOps and eksctl anywhere upgrade methods of cluster upgrades, for information on which properties can be modified after initial cluster creation.
3. Launch the cluster creation
Once you have modified the cluster configuration file, use eksctl anywhere cluster create -f $CLUSTER_NAME.yaml as described in the production environment
section to start the cluster creation process.
To see details on the cluster creation process, you can increase the verbosity (-v=9 provides maximum verbosity).
4. Authenticate and create bootstrap cluster
After authenticating to vSphere and validating the assets there, the cluster creation process starts off creating a temporary Kubernetes bootstrap cluster on the Administrative machine.
If you are watching the output of eksctl anywhere cluster create for those steps, you should see something similar to the following:
To begin, the cluster creation process runs a series of govc commands to check on the vSphere environment. First, it checks that the vSphere environment is available:
Performing setup and validations
✅ Connected to server
Using the URL and credentials provided in the cluster spec files, it authenticates to the vSphere provider:
✅ Authenticated to vSphere
It validates the datacenter exists:
✅ Datacenter validated
It validates that the datacenter network exists:
✅ Network validated
It validates that the identified datastore (to store your EKS Anywhere cluster) exists, that the folder holding your EKS Anywhere cluster VMs exists, and that the resource pools containing compute resources exist.
If you have multiple VSphereMachineConfig objects in your config file, will see these validations repeated:
✅ Datastore validated
✅ Folder validated
✅ Resource pool validated
It validates the virtual machine templates to be used for the control plane and worker nodes (such as ubuntu-2004-kube-v1.20.7):
✅ Control plane and Workload templates validated
If all those validations passed, you will see this message:
✅ Vsphere Provider setup is valid
Next, the process runs the kind command to build a single-node Kubernetes bootstrap cluster on the Administrative machine. This includes pulling the kind node image, preparing the node, writing the configuration, starting the control-plane, installing CNI, and installing the StorageClass. You will see:
Creating new bootstrap cluster
After this point the bootstrap cluster is installed, but not yet fully configured.
Continuing cluster creation
If all goes well, the cluster should be created from the eksctl anywhere cluster create command and the config file you provided without any further actions from you.
The following diagram illustrates the activities that occur next:
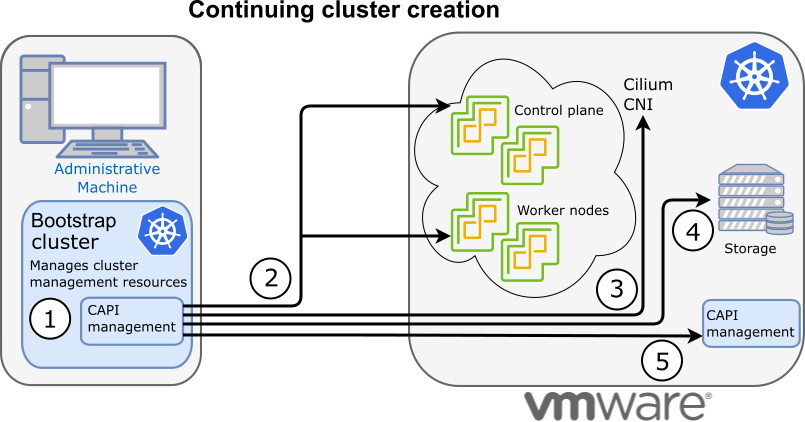
1. Add CAPI management
Cluster API (CAPI) management is added to the bootstrap cluster to direct the creation of the workload cluster.
2. Set up cluster
Configure the control plane and worker nodes.
3. Add Cilium networking
Add Cilium as the CNI plugin to use for networking between the cluster services and pods.
4. Add storage
Add the default storage class to the cluster
5. Add CAPI to workload cluster
Add the CAPI service to the workload cluster in preparation for it to take over management of the cluster after the cluster creation is completed and the bootstrap cluster is deleted. The bootstrap cluster can then begin moving the CAPI objects over to the workload cluster, so it can take over the management of itself.
The following text continues to follow along with the output from eksctl anywhere cluster create as just described.
Installs the CAPI service on the bootstrap node:
Installing cluster-api providers on bootstrap cluster
Performs provider-specific setup for core components. For the default configuration, you should see these: etcdadm-bootstrap, etcdadm-controller, control-plane-kubeadm, and infrastructure-vsphere and sets up cert-manager. The CAPI controller-manager is also configured:
Provider specific setup
With the bootstrap cluster running and configured on the Administrative machine, the creation of the workload cluster begins.
It uses kubectl to apply a workload cluster configuration.
Then it waits for etcd, the control plane, and the worker nodes to be ready:
Creating new workload cluster
Once etcd, the control plane, and the worker nodes are ready, it applies the networking configuration to the workload cluster:
Installing networking on workload cluster
Next, the default storage class is installed on the workload cluster:
Installing storage class on workload cluster
After that, the CAPI providers are configured on the workload cluster, in preparation for the workload cluster to take over responsibilities for running the components needed to manage the itself.
Installing cluster-api providers on workload cluster
With CAPI running on the workload cluster, CAPI objects for the workload cluster are moved from the bootstrap cluster to the workload cluster’s CAPI service (done internally with the clusterctl command):
Moving cluster management from bootstrap to workload cluster
At this point, the cluster creation process will add Kubernetes CRDs and other addons that are specific to EKS Anywhere. That configuration is applied directly to the cluster:
Installing EKS-A custom components (CRD and controller) on workload cluster
Creating EKS-A CRDs instances on workload cluster
Installing AddonManager and GitOps Toolkit on workload cluster
If you did not specify GitOps support, starting the flux service is skipped:
GitOps field not specified, bootstrap flux skipped
The cluster configuration is saved:
Writing cluster config file
With the workload cluster up, and the CAPI service running on the workload cluster, the bootstrap cluster is no longer needed and is deleted:
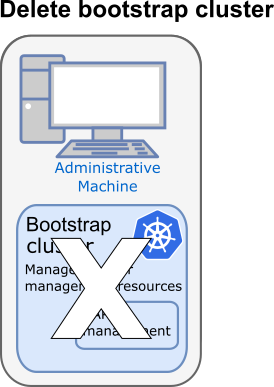
Deleting bootstrap cluster
Cluster creation is complete:
🎉 Cluster created!
At this point, the workload cluster is ready to use, both to run workloads and to accept requests to change, update, or upgrade the cluster itself.
You can continue to use eksctl anywhere to manage your cluster, with EKS Anywhere handling the fact that CAPI management is now being fulfilled from the workload cluster instead of the bootstrap cluster.
After cluster creation
With the EKS Anywhere cluster up and running, you might be interested to know how your cluster is set up and what it is composed of. The following sections describe different aspects of an EKS Anywhere cluster on a vSphere provider and what you should know about them going forward.
See Add integrations for information on example third-party tools for adding features to EKS Anywhere.
Networking
Networking features of your EKS Anywhere cluster start with how virtual machines in the EKS-A cluster in vSphere are set up. The current state of networking on the vSphere node level include the following:
- DHCP: EKS Anywhere requires that a DHCP server be available to the control plane and worker nodes in vSphere for them to obtain their IP addresses. There is currently no support for static IP addresses or multi-network clusters. All control plane and nodes are on the same network.
- CAPI endpoint: A static IP address should have been assigned to the control plane configuration endpoint, to provide access to the Cluster API. It should have been set up to not conflict with any other node IP addresses in the cluster. This is a specific requirement of CAPI, not EKS Anywhere.
- Proxy server: If a proxy server was identified to the EKS Anywhere workload cluster, that server should have inbound access from the cluster nodes and outbound access to the internet.
Networking for the cluster itself has the following attributes:
- Cilium CNI: The Cilium Kubernetes CNI is used to provide networking between components of the control plane and data plane components. No other CNI plugins, including Cilium Enterprise, is supported at this time.
- Pod/Service IP ranges: Separate IP address blocks were assigned from the configuration file during cluster creation for the Pods network and Services network managed by Cilium. Refer to the clusterNetwork section of your configuration file to see how the cidrBlocks for pods and services were set.
Networking setups for accessing cluster resources on your running EKS Anywhere cluster include the following documented features:
- Load balancers: You can add external load balancers to your EKS Anywhere cluster. EKS Anywhere project documents how to configure KubeVip and MetalLB .
- Ingress controller: You can add a Kubernetes ingress controller to EKS Anywhere. The project documents the use of Emissary-ingress ingress controller.
Operating systems
The Ubuntu or Mac operating system representing the Administrative machine can continue to use the binaries to manage the EKS anywhere cluster.
You may need to update those binaries
(kubectl, eksctl anywhere, and others) from time to time.
In the workload cluster itself, the operating system on each node is provided from either Bottlerocket or Ubuntu OVAs. Note that it is not recommended that you add software or change the configuration of these systems once they are running in the cluster. In fact, Bottlerocket contains limited writeable areas and does not include a software package management system.
If you need to modify an operating system, you can rebuild an Ubuntu OVA to use with EKS Anywhere. In other words, all operating system changes should be done before the OVA is added to your EKS Anywhere cluster.
Authentication
Supported authentication types are listed in the AuthN / AuthZ section of the EKS Anywhere FAQ.
Storage
The amount of storage assigned to each virtual machine is 25GiB, by default. It could be different in your case if you had changed the diskGiB field in the EKS Anywhere config. As for application storage, EKS Anywhere configures a default storage class and supports adding compatible Container Storage Interface (CSI) drivers to a running workload cluster. See Kubernetes Storage for details.